
Photo by Mohammad Rahmani on Unsplash
To install ChatWithCloud CLI, make sure Node.js is installed, then run npx chatwithcloud. That downloads and starts it without a global install. You can also use Homebrew (brew tap chatwithcloud/tap && brew install chat-with-cloud), pnpm dlx chatwithcloud or bunx chatwithcloud. The first run asks four setup questions, and your first 15 runs are free with no OpenAI key.
This guide is for developers and platform engineers who want ChatWithCloud running on their machine in a few minutes, without surprises. If you’re still choosing a tool, our comparison of ChatWithCloud vs Amazon Q Developer in the terminal covers the trade-offs. This guide covers every way to install ChatWithCloud CLI, what you need beforehand, what the first run asks, and how to update or uninstall it later.
By the end you’ll have the CLI starting against a read-only AWS profile, which is the setup we recommend for anyone exploring an account. If you want to understand what happens after you type a question, the walkthrough of how ChatWithCloud works covers the full request loop.
What do you need before you install?
ChatWithCloud is published on npm as chatwithcloud and needs Node.js, whichever runner you use to start it. Check what you have first:
node --version
npm --version
# Optional, but handy for checking profiles
aws --version
aws configure list-profiles- Node.js. If
node --versionfails, install a current LTS release from the official Node.js download page. npm andnpxcome with it. - At least one AWS profile. ChatWithCloud doesn’t ask for access keys. It reads the profiles in
~/.aws/credentialsand~/.aws/config, the same files the AWS CLI uses. AWS documents the format in its config and credentials file reference. For named profiles, SSO and assumed roles, see how to connect ChatWithCloud to your AWS account with profiles, SSO and roles. - An OpenAI API key is optional. The first 15 runs are free and go through ChatWithCloud’s managed endpoint, so you can start without one.
- Ideally, a read-only profile. Whatever that profile can do, the CLI can do. More on this below.
Which install method should you choose?
All four commands start the same tool. The difference is whether anything stays installed on your machine afterwards.
| Method | Command | Global install? | Good for |
|---|---|---|---|
| npx | npx chatwithcloud |
No, runs from the npm cache | Trying it once, CI-like throwaway use |
| Homebrew | brew tap chatwithcloud/tap && brew install chat-with-cloud |
Yes | Mac users who manage tools with brew |
| pnpm | pnpm dlx chatwithcloud |
No | Teams that standardize on pnpm |
| Bun | bunx chatwithcloud |
No | Machines where Bun is the default runner |
| npm global | npm install -g chatwithcloud |
Yes | Daily use with the short cwc command |
After a global install (Homebrew or npm install -g), the command is available as chatwithcloud and as the shorter alias cwc.
How to install ChatWithCloud CLI step by step
- Confirm Node.js worksRun
node --version. If you use a version manager such as nvm, make sure the shell you’re in has a Node version selected. - Confirm your AWS profile worksRun
aws sts get-caller-identity --profile your-profile. If that prints your account ID and ARN, ChatWithCloud can use the same profile. For IAM Identity Center (SSO) profiles, runaws sso login --profile your-profilefirst. - Start the CLIPick one of the commands from the table. With npm 7 or later,
npxasks Need to install the following packages the first time; answery, or pass--yesto skip the prompt. - Answer the four setup questionsExperience level, AI model, whether you have an OpenAI key, and anonymous analytics. Details are in the next section.
- Pick an AWS profileThe CLI lists the profiles it found and asks which to use. To skip the picker, start it with
AWS_PROFILE=namein front of the command. - Ask a first questionStart with something harmless and read-only, such as “What is my total AWS cost for this month?” or “How many Lambda functions do I have?” When you’re ready to go further, you can ask AI why your AWS bill increased, list AWS resources with natural language or ask AI which S3 buckets are largest.
Run ChatWithCloud with npx, pnpm or Bun
# npm (npx ships with Node.js)
npx chatwithcloud

# Always fetch the newest published version
npx chatwithcloud@latest

# pnpm
pnpm dlx chatwithcloud

# Bun
bunx chatwithcloud
Install ChatWithCloud with Homebrew on a Mac
brew tap chatwithcloud/tap
brew install chat-with-cloud

# Then start it with either name
chatwithcloud
cwc
The first line adds ChatWithCloud’s tap, a third-party formula repository. Homebrew explains how taps work in its taps documentation.
What does the first run ask?
The first time you start it, ChatWithCloud asks four questions and saves the answers in ~/.chatwithcloud/aws.json:
- AWS experience level: Beginner, Intermediate or Pro. Answers are pitched at that level.
- AI model: GPT-4o, GPT-4o Mini, GPT-4 Turbo or GPT-4.
- Whether you have an OpenAI API key. You can say no and still use the first 15 free runs. After that, the ChatWithCloud monthly, yearly and lifetime plans are a managed subscription (no key needed) or a lifetime license that uses your own key.
- Anonymous analytics: yes or no.
To change any of these later, type /settings at the question prompt. Conversations are saved as JSON files in the same ~/.chatwithcloud/ folder, so treat that folder like any other file holding account data. More setup and billing answers are collected in the ChatWithCloud FAQ on setup and privacy.
Example: a first session on a read-only profile
This is the sequence we’d suggest on a new machine. The profile name cwc-readonly is an example; use whatever read-only profile you have.
# 1. Check which identity the profile resolves to
aws sts get-caller-identity --profile cwc-readonly

# 2. Start ChatWithCloud on that profile, skipping the picker
AWS_PROFILE=cwc-readonly npx chatwithcloud

# 3. At the prompt, try read-only questions such as:
#    What is my total AWS cost for this month?
#    How many IAM users are there in my account?
#    Do I have any active CloudWatch alarms?
The region comes from the profile’s region setting, and defaults to us-east-1 if the profile doesn’t set one. Each session uses one profile and one region, so start a new session to switch accounts. For concrete question ideas by job, browse the ChatWithCloud use cases.
What AWS permissions does the CLI need?
Installing needs no AWS permissions at all. Running it is different: ChatWithCloud has exactly the permissions of the profile you pick, and generated code runs without a confirmation step. Ask it to “stop the dev instances” on an admin profile and it will.
Use a read-only profile to explore. AWS’s ReadOnlyAccess managed policy covers most questions. Cost questions also need Cost Explorer ce: permissions. Keep write access in a separate profile you pick only when you mean to change something.
The same read-only profile is the right starting point if you later want to analyze your AWS security posture with an AI CLI.
The ChatWithCloud security model explains what stays on your machine: your AWS credentials stay in ~/.aws and are never copied or uploaded. Your question, the conversation context and the JSON returned by AWS calls are sent to the model.
Troubleshooting common install problems
These fixes cover installing and starting the CLI. Once it runs, you can use it to troubleshoot AWS infrastructure with an AI CLI.
npx: command not found or node: command not found
Node.js isn’t installed, or it isn’t on your PATH in this shell. Install it from nodejs.org, or activate a version with your version manager, then open a new terminal.
chatwithcloud: command not found after using npx
That’s expected. npx, pnpm dlx and bunx don’t add a command to your PATH. Keep using the runner, or install globally with Homebrew or npm install -g chatwithcloud to get chatwithcloud and cwc.
Homebrew says there’s no formula named chat-with-cloud
The tap is missing. Run brew tap chatwithcloud/tap first, then install again. Note the different names: the npm package is chatwithcloud, the Homebrew formula is chat-with-cloud.
Global pnpm or Bun installs don’t show up
If you install globally with pnpm add -g or bun add -g instead of the one-off runners, their global bin folders must be on your PATH. For pnpm, pnpm setup configures that. Whichever runner you use, Node.js still needs to be installed.
Your profile isn’t in the list, or SSO fails
Check the profile exists with aws configure list-profiles. Profiles in ~/.aws/config are written as [profile name], while ~/.aws/credentials uses [name]. For SSO profiles that use an sso-session block, run aws sso login --profile name before starting the CLI.
How do you update or uninstall ChatWithCloud?
# Update
npx chatwithcloud@latest          # npx: run the newest version
brew upgrade chat-with-cloud      # Homebrew
npm install -g chatwithcloud@latest

# Uninstall
brew uninstall chat-with-cloud && brew untap chatwithcloud/tap
npm uninstall -g chatwithcloud

# Remove settings and saved conversations (also deletes a stored OpenAI key)
rm -rf ~/.chatwithcloud
Removing ~/.chatwithcloud doesn’t touch your AWS configuration. Your profiles in ~/.aws stay exactly as they were.
Limits worth knowing before you start
- It can be wrong. The model writes code for your question. Code that runs cleanly can still answer a slightly different question, so check anything important.
- It uses AWS SDK for JavaScript v2. That SDK reached end-of-support on 8 September 2025, so services and features launched after that may be missing.
- One profile and one region per session. Start a new session to change either.
- Generated code isn’t reviewed before it runs. Your IAM permissions are the only guardrail, which is why the read-only profile matters.
Frequently asked questions
Can I start ChatWithCloud without an OpenAI API key?
Yes. Answer “no” to the API key question during setup. The first 15 runs are free and use ChatWithCloud’s managed endpoint. After that, the monthly and yearly plans don’t need a key either; only the lifetime license uses your own.
Do I need to install ChatWithCloud globally?
No. npx chatwithcloud, pnpm dlx chatwithcloud and bunx chatwithcloud all run it without a global install. Install globally only if you want the chatwithcloud and cwc commands available everywhere.
How do I set up ChatWithCloud on a Mac terminal?
Install Node.js, then either run npx chatwithcloud or use Homebrew: brew tap chatwithcloud/tap followed by brew install chat-with-cloud. Make sure you have at least one profile in ~/.aws.
Where does ChatWithCloud store its settings?
In ~/.chatwithcloud/aws.json. Conversations are saved as JSON files in the same folder. Type /settings at the prompt to change your answers without editing the file.
Which Node.js version do I need?
ChatWithCloud needs Node.js; we recommend a current LTS release, since older Node versions stop receiving security fixes. If npx works in your shell, you have what the runners need.
Related guides
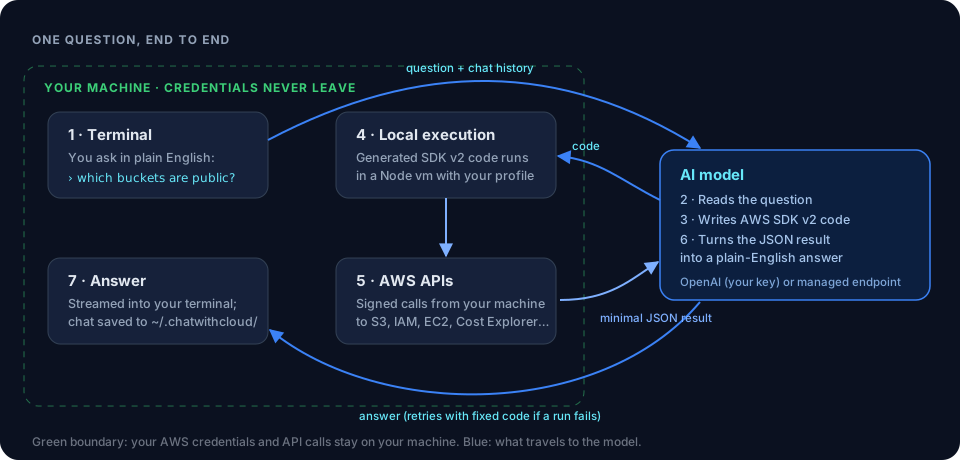 How ChatWithCloud worksWhat happens between your question and the answer, step by step.
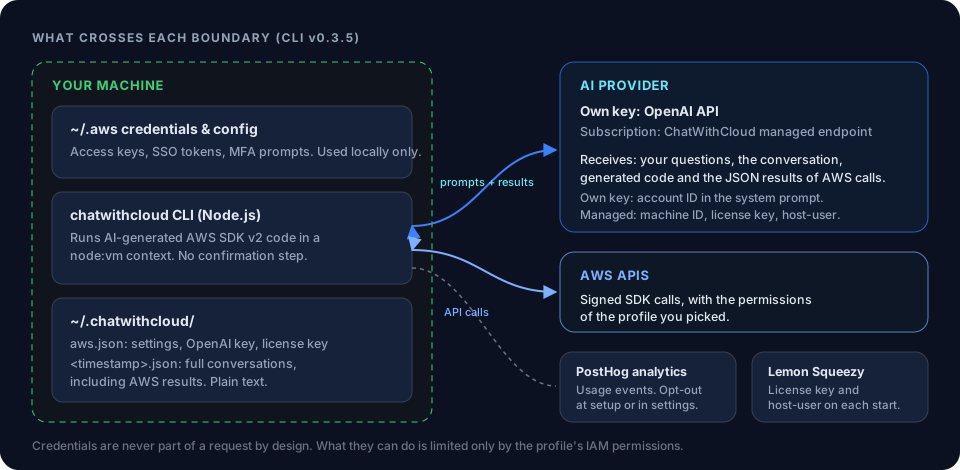 Security and read-only setupWhat stays local, what’s sent, and how to set up a read-only role.
Connect ChatWithCloud to your AWS accountThe next step: profiles, SSO sessions, assumed roles and regions.
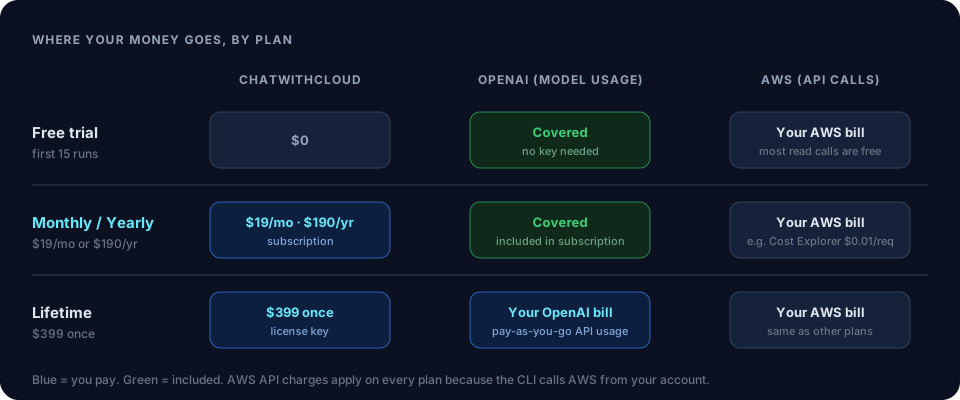 Plans and pricingCompare the managed subscription with the lifetime license.
Ask AI Which S3 Buckets Are LargestFind your biggest and publicly exposed S3 buckets with plain-English questions.
Analyze Your AWS Security Posture With an AI CLIAn ad-hoc AWS security review in plain English.
Ask your AWS account in plain English
Your first 15 runs are free, with no OpenAI key needed.
npx chatwithcloud