ChatWithCloud Security: What Stays Local and What Gets Sent
ChatWithCloud is an AI CLI that runs code against your AWS account, so it’s fair to ask exactly what it can touch and where your data goes. This page explains it plainly, based on the published CLI code (version 0.3.5): how credentials are handled, what’s sent to the AI provider, what the CLI stores on disk, and how to set it up so a wrong answer can’t damage anything.
Security at a glance
| Item | Where it goes |
|---|---|
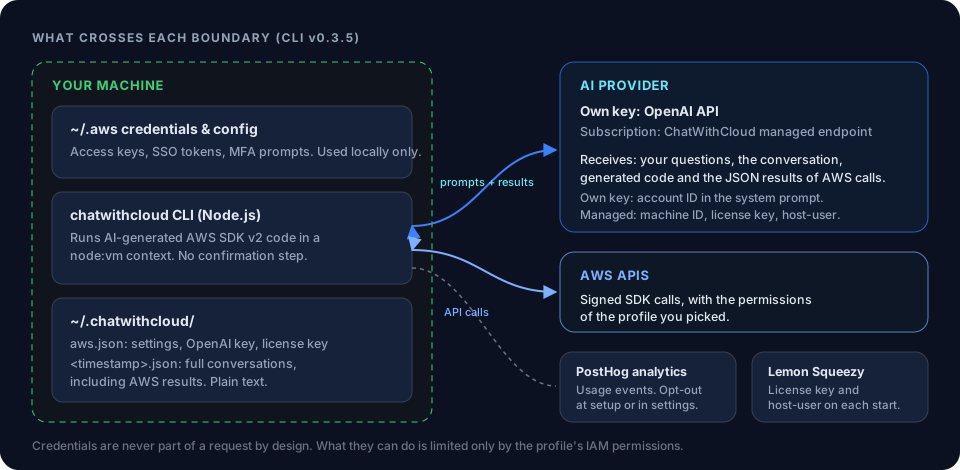
| AWS access keys, SSO tokens, MFA codes | Stays local Read from ~/.aws and used by the AWS SDK on your machine. Never included in requests. |
| AWS API calls | Your machine → AWS Signed and sent directly from your machine, with the permissions of the profile you pick. |
| Your questions and the conversation | Sent to AI provider OpenAI with your own key, or ChatWithCloud’s managed endpoint with a subscription. |
| Generated code and the JSON results of AWS calls | Sent to AI provider The model reads the results to write its answer, so resource names, IDs, costs and configuration details leave your machine. |
| AWS account ID | Sent to AI provider Included in the system prompt when you use your own OpenAI key. |
| Usage analytics | Optional Events sent to PostHog if you enable analytics during setup. |
| License key | License checks Validated with Lemon Squeezy each time the CLI starts. |
How your AWS credentials are handled
ChatWithCloud doesn’t ask for AWS keys and has no account of its own. When it starts, it lists the profiles in your ~/.aws/credentials and ~/.aws/config files and asks you to pick one. Set the AWS_PROFILE environment variable to skip the prompt. The region comes from that profile, or us-east-1 if the profile doesn’t set one.
- Access keys and assumed roles are resolved by the AWS SDK’s standard credential provider chain, including
role_arn/source_profileprofiles. - MFA-protected roles prompt you for a code in the terminal.
- IAM Identity Center (SSO) profiles open a device-authorization link that you approve in your browser. The CLI then gets short-lived role credentials.
Credentials are used only by the SDK on your machine to sign requests to AWS. They’re never part of a message to the AI provider. How ChatWithCloud works walks through the full request cycle.
What’s sent to the AI, and to whom
To answer a question, the model has to see what your AWS account returned. The CLI sends it your question, then runs the code the model writes, then sends back the result of that code so the model can explain it. That loop repeats until it has an answer. Everything in that loop goes to the AI provider. Which provider that is depends on your plan:
With your own OpenAI API key (lifetime license)
The CLI calls the OpenAI API directly with your key and the model you chose in settings (GPT-4o, GPT-4o mini, GPT-4 Turbo or GPT-4). OpenAI receives the system prompt, which includes your AWS account ID and the AWS experience level you chose, plus your questions, the generated code and the JSON results. Before each question the CLI calls STS GetCallerIdentity to find the account ID.
With the managed subscription or the free trial
The conversation is sent to ChatWithCloud’s managed endpoint, which calls the model for you. Along with the messages, the CLI sends a machine identifier, your license key, and your hostname and username (as HOST-USER) for licensing. The endpoint’s own retention policy isn’t published in the CLI or on this site. If that matters to you, ask before sending sensitive data.
License checks
Each time the CLI starts, it validates your license key with Lemon Squeezy, the payment provider, sending the key and your HOST-USER string as the instance name.
Generated code runs without a confirmation step
This is the most important thing on this page. The CLI tells the model to “assume user always wants to proceed, do not ask for confirmation”, and it runs every piece of code the model writes straight away. If a request means creating, changing or deleting resources, and your profile allows it, the change happens without a preview.
This is what makes fixing things from a question possible, but it means the IAM permissions of your profile are the only real safety limit. When a generated script fails, the CLI sends the error back to the model, which is instructed to fix the code and retry up to three times.
The code runs inside a Node.js vm context. Node’s documentation states that the vm module is not a security mechanism, and the code has access to the same configured AWS SDK the CLI uses. Treat it as code running with your profile’s full permissions, not as a sandbox.
Recommended setup: a dedicated read-only profile
The simplest protection is to never run ChatWithCloud with your admin profile. Create an IAM role only for it, attach a read-only AWS managed policy, and point a named profile at that role:
[profile cwc-readonly]
role_arn = arn:aws:iam::123456789012:role/ChatWithCloudReadOnly
source_profile = default
region = us-east-1
Then start the CLI with AWS_PROFILE=cwc-readonly npx chatwithcloud. The role’s trust policy must allow your source identity to assume it. AWS’s guide to using an IAM role in the AWS CLI covers the same profile format. Pick the policy based on what you want the AI to be able to read, since anything it reads is sent to the model:
| AWS managed policy | What it allows | Good for |
|---|---|---|
| ViewOnlyAccess | Lists and describes resources and their metadata. It can’t read object contents or table items, and it has no Cost Explorer access. | Inventory and troubleshooting questions with the least data exposure. |
| SecurityAudit | Reads security configuration: IAM, bucket policies and public access settings, security groups, logging setup. | Security reviews. Combine with ViewOnlyAccess for broader coverage. |
| ReadOnlyAccess | Reads almost everything, including S3 object contents (s3:Get*), DynamoDB items and CloudWatch Logs, plus Cost Explorer. | Cost questions and deep investigation. Only use it where the AI provider may see that data. |
For cost questions without full ReadOnlyAccess, add a small inline policy allowing ce:GetCostAndUsage to a ViewOnlyAccess role. AWS describes these policies in its managed policies for job functions guide. To confirm what a profile can actually do, see how to check the permissions of your current IAM role.
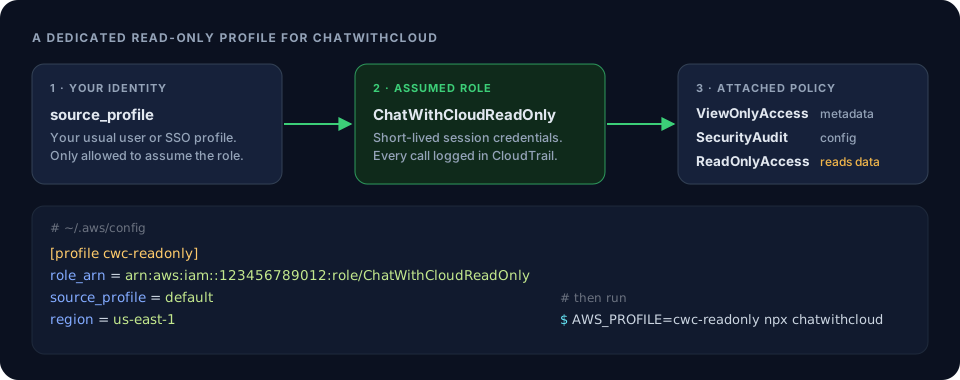
Two more habits help. Try the CLI in a non-production account first. And keep CloudTrail on, so every call the generated code made is recorded under the role’s session. The AWS guide to viewing CloudTrail event history shows how to filter by role.
Analytics
During first-run setup, the CLI asks: “Do you want to enable anonymous analytics?” Your answer is saved in its settings, and you can change it later by typing /settings in the CLI. Analytics use PostHog with GeoIP lookup disabled, and events are keyed to a machine identifier rather than your name or email.
- Events sent: started, credentials picked, question asked, chat length, and setup choices (experience level, model, whether you use your own key, your analytics answer). No question text is included.
- Failed code is the exception. When generated code throws an error, the CLI sends an
incorrect-code-generatedevent with the error message, the code and the model’s explanation. The code can include resource names from your account. - Timing: in version 0.3.5, the setup event and the first “started” and identify calls happen before the opt-out setting is applied.
Files ChatWithCloud stores on your machine
~/.chatwithcloud/aws.jsonholds your settings, including your OpenAI API key and license key in plain text. Restrict it withchmod 600on macOS and Linux, and don’t sync it to shared drives or dotfile repos.~/.chatwithcloud/<timestamp>.jsonis written for every session. It contains the full conversation, including the AWS results the model saw. Delete old sessions if they contain sensitive output.
What OpenAI does with API data
If you use your own key, OpenAI’s API terms apply to what the CLI sends. According to OpenAI’s data controls documentation, data sent to the API is not used to train OpenAI models unless you explicitly opt in. By default, abuse-monitoring logs, which may include prompts and responses, are kept for up to 30 days. Eligible organizations can apply for Zero Data Retention. Check your OpenAI organization’s settings if your policy requires it.
Checklist for security-conscious teams
- Create a dedicated IAM role for ChatWithCloud. Never run it with admin or root credentials.
- Attach
ViewOnlyAccessorSecurityAudit. AddReadOnlyAccessonly where the data may be shared with the AI provider. - Prefer SSO or assumed-role profiles, so the credentials in use are short-lived.
- Start in a sandbox or non-production account.
- Keep CloudTrail enabled and review the role’s activity.
- Answer “No” to analytics if your policy forbids third-party telemetry.
- Lock down
~/.chatwithcloud/and clear old session files. - Decide whether your data may go to OpenAI or to ChatWithCloud’s managed endpoint before choosing a plan.
Two practical AWS examples are useful companion checks: finding security groups open on common ports and sorting S3 buckets into public and private. More answers are in the ChatWithCloud FAQ.
Try it with a read-only profile
Set up the profile above, then ask your account a question. The first 15 runs are free.